|
The values of fields stored in the client certificate that is sent in the HTTP request. |
|
|
The values of cookies sent in the HTTP request. |
|
|
The values of form elements in the HTTP request body. |
|
|
The values of variables in the HTTP query string. |
|
|
The values of predetermined environment variables. |
|
Read-only; specifies the total number of bytes the client is sending in the body of the request. |
|
Retrieves data sent to the server from the client as part of a POST request. |
Variable parameters are strings that specify the item to be retrieved from a collection or to be used as input for a method or property. For more information about the variable parameter, see the individual collection reference pages.
An ASP collection is exactly what you think it is – a collection of data stored in an object. Collections are analogous to JavaScript arrays with a few important differences
· Collections are one-based
· Collections are key-value pairs
Collections are really just categories of information. They act as repositories of data stored in much the same way that HTML attributes are stored. All members of the collection have a name and a value associated with the name. You can access the value of a member either by asking for it by name or by using the Key property and an associated index:
Request.CollectionName(“memberName”);
Request.CollectionName.Key(memberIndex);
In fact, the CollectionName is optional when you are asking for a named member (i.e. you know the name of the member). If you don’t specify a Collection Name, the Request Object will search through all of its collections until it either finds the member or throws an error (if, for example, the member doesn’t exist). So, I could have written the first line of code as:
Request(“memberName”);
Using the index of a member requires specifying the collection name. A good rule to follow is if you are accessing individual members, you can use the shorthand notation. If you are addressing all of the members (in a loop, for example), use the Key property and the associated indices.
All collections provide three properties: Item, Key, and Count. You can use the Count property to determine how many members a collection has:
Request.CollectionName.Count;
The Item property allows you to refer to a member of the collection by name:
Request.CollectionName.Item(“memberName”);
You may have guessed that the above code was unnecessary and you’re right. You’ve already seen that you can access a named member in a collection without using the Item property. The part that makes the Item property powerful is the fact that it too has a Count property. This is important as there will be times when multiple values are stored in an item. The classic example is the retrieval of values for HTML select and checkbox controls. Because multiple selections can be made in either of those controls, you’ll need a way to retrieve all of them – without knowing how many there are:
var count = Request(“food”).Count;
var foods = ‘’;
for(i=1;i<=count;i++){
if(foods != ‘’)
foods += ‘, ‘;
foods += Request(“food”)(i);
}
Notice above that the loop begins at 1 – not 0 – because collections are one-based. Also notice that to refer to individual elements in a multi-valued item, you use the name of the item followed by the index.
The Key property allows you to refer to members of a collection by their index rather than their name. This is especially useful when you don’t know the names of the members or you’re not sure how many members there are:
var count = Request.ServerVariables.Count;
var name;
var list = ‘’;
for(i=1;i<=count;i++){
name = Request.ServerVariables.Key(i);
list += name + ': ‘);
list += Request.ServerVariables(name) + '\n');
}
Notice that you can retrieve the key (name) of any member of a collection by using the Key property and an associated index. Once you’ve retrieved the name of the member, you can then reference the value by asking for the member by name. The above code creates a String called “list” which holds a description of the ServerVariables collection. Later, you’ll create an ASP page that displays the ServerVariables in the browser using the same construct illustrated above.
How many times have you visited a web page, clicked on a link, and then, the address bar in the browser displayed a very long address? It happens to me all the time. If you’ve been wondering what all of those characters mean, you’re about to find out! Upon closer inspection, those extra characters usually start with a “?” followed by key/value pairs separated by “&”. The extra characters, beginning with the “?” are called the Query String. It might look something like this:
http://www.ncc.commnet.edu/phonebook.asp?filter=d
The above passes variable called “filter” to the phonebook.asp ASP and associates a value of “d” with the variable. The QueryString collection can then be used in phonebook.asp to retrieve the filter variable like this:
Request.QueryString(“filter”);
or
Request(“filter”);
If you need to store the value of the member, use a variable:
var filter = Request.QueryString(“filter”);
or
var filter = Request(“filter”);
In the first line, the member of the QueryString collection called “filter” is retrieved and its value is stord in the local variable called filter. In the second line, all of the collections in the Request Object are searched for a member called “filter.” When a member is found in any collection matching the name “filter”, its value is stored in the local variable.
That presents an interesting question. If you leave the collection name out, then how do you know which collection is searched first? ASP defines the search order of collections as follows:
1. QueryString
2. Form
3. Cookies
4. ClientCertificates
5. ServerVariables
Usually, the search is done correctly but you must be careful of the context of the search. If, for example, you’ve got members in two collections with the same name, ASP will return the first one it finds based on the order above. Of course you can always limit the search to a particular collection by specifying the collection as in the first line of the above example.
There are a few ways to create QueryStrings. I’ll address the two most prevalent here and later on, when we talk about hitting a database, address a few others. The first way to create a QueryString is what I call the brute-force approach. You simply write it out by hand. You must be sure to include the “?” after the page name and then separate the key/value pairs by ampersands:
<a href=”somePage.asp?key1=value1&key2=value2&key3=value3”>Text</a>
The above line of code adds three members to the QueryString collection of the Request Object called key1, key2, and key3. It also associates value1 with key1, value2 with key2, and value3 with key3. You can then access the members on somePage.asp like this:
var key1 = Request(“key1”);
var key2 = Request(“key2”);
var key3 = Request(“key3”);
The second way to create QueryStrings is through the submission of a form by the user. When an HTML <form> element has its method attribute set to “get”, the data from the form is appended to the query string:
<form method=”get” action=”somePage.asp”>
<input type=”text” name=”key1”></input>
</form>
When the above form is submitted, the value typed in by the user in the key1 field is appended to the QueryString of the request to somePage.asp. If the user typed in “Tom” for example, the reuest would look like this:
http://www.machineName.com/somePage.asp?key1=Tom
You would access the value in exactly the same manner as you would any other QueryString member.
The Form collection is nearly identical to that of the QueryString collection. The only difference is that the Form collection contains information sent by the user through a “post” request rather than a “get” request. If you specify “post” as the method attribute in an HTML <form> element, the data is sent in HTTP format to the server. The result is that a second request holding the data is sent to the resource specified in the form’s action attribute. You access the members of the Form collection in exactly the same way that you access the members of the QueryString collection:
Request.Form(“memberName”);
or
Request(“memberName”);
So, if the only difference between the QueryString collection and the Form collection is determined by how the data is sent to the server, how do you know which one to use? I have some simple guidelines that I follow:
· Older browsers may have a limit on the number of characters allowed in the query string. If your form has a lot of data in it, it may not work as a query string. In that case, use the “post” method and the Form collection.
· Any data sent along in a “get” request is plainly visible to the user (and whoever is looking on) in the address bar of the browser. If you have sensitive data or hidden form fields that you don’t want anyone to see, use the “post” method and the Form collection.
· If you need to build hyperlinks dynamically from a database, for example, use the query string and dynamically build the query string as necessary.
Based on my guidelines above, I almost always use the “post” method for forms and query strings whenever I need to generate a hyperlink. The only exception to the rule for me is when I want the user to know something about the request they’ve made. In that case, I’ll use the “get” method so that the user’s info is plainly visible in the address bar. These guidelines work for me but they aren’t hard and fast rules. Sometimes, it’s easily apparent to me which method/collection to use – sometimes it isn’t. When it’s not apparent, I just wing it – and fix my mistakes along the way.
Cookies are small pieces of data stored on the user’s machine. They are associated with a particular domain name and only the server from that domain can read the cookies written by the domain. The Request Object includes a collection of the cookies that is accessed in the same fashion as the QueryString and Forms colections:
Request.Cookies(“cookieName”);
Cookies represent older technology that helped early Web Developers maintain state between requests. Each time a request was made to a particular domain, the cookies written by that domain were sent along with the request. This allowed developers to store things like customer IDs and user preferences relatively easily. When users discovered that servers were storing information on their machines, however, there was an outcry. It sounded too much like a virus. Cookies are harmless though – they’re just text stored in a convenient spot. They are not executable and, therefore, can do no harm to a user’s machine. The problem is that since cookies have such a bad (albeit undeserved) reputation, some users simply disable them. You shouldn’t rely on cookies to hold information about your users as you don’t know if all of your users allow cookies.
There are times, though, when only a cookie will do the trick. As an example, many e-commerce sites require users to login to the site so that tailored information can be sent back to the user. In many cases, the user can choose to login each time they visit the site or the login can occur automatically. One of the ways to login automatically is for the server to store the information necessary for the login to occur in a cookie and then retrieve it from the Request Object for verification.
The ClientCertificate collection stores information about the digital certificates sent by the browser in the request. An Active Server Page can look for a client certificate in the collection and then, for example, grant or deny access to resources based on the information stored in the collection. Information about the certificate’s issuer and the client, such as common name, country, state or province, organization, and title are stored in the certificate. Client Certificates provide a very robust but very complicated way to authenticate users.
The ServerVariables collection contains information about the server, the browser and the request made by the user. Many of the values stored in the ServerVariables collection are sent along in the HTTP headers of the request. Your applications may never use the values stored in this collection as many of the settings are exposed as objects by the server anyway but having knowledge of them can aid you in building sophisticated Web Applications.
Here’s a simple example that illustrates how to access Request variables. The example consists of an HTML page with a form on it and an Active Server Page to handle the submission of the form. Open your text editor and create the following HTML page:
<html>
<head>
<title>Request Object Test </title>
<head>
<body>
<form action=”requestExample.asp” method=”post”>
First Name: <input type=”text” name=”firstName”><br>
LastName: <input type=”text” name=”lastName”><br>
<input type=”submit” value=”Sign In”>
</form>
</body>
</html>
Save the file as requestExample.htm. Then open a new file in your text editor and create requestExample.asp:
<%@ language=”JavaScript”%>
<html>
<head>
<title>Request Object Handler</title>
</head>
<body>
Hello:<br>
First Name: <%= Request(“firstName”) %><br>
Last Name: <%= Request(“lastName”) %>
</body>
</html>
To test the example, place both the above files in the same folder in the public root of your web server (See Beginning ASP). Then open your browser and access the HTML file via http:
http://localhost/{folder}/requestExample.htm
Fill out the form and the click the Sign In button. Submitting the form sends the values stored in the <input> fields along with the request.
All ASP code is interpreted BEFORE being sent back to the browser. Essentially, the web server recognizes the request for an ASP page via the extension of the file (.asp). That’s important as ONLY those requests that end in .asp will be treated as Active Server Pages.
Once the web server recognizes a request for an Active Server Page, it hands off the instructions to the ASP engine. The ASP engine then scans the file and executes the ASP instructions. Those instructions are either contained in a <script> block that possesses a runat=”server” attribute or inside <%...%> shorthand tags. Note that the ASP engine doesn’t execute blocks of code to be sent to the client.
Once the ASP instructions have been evaluated, the ASP engine hands the response stream back to the web server to complete the request. It’s important to note that the data delivered back to the client is pure HTML. In other words, users see the results of your ASP instructions – not the instructions themselves. This makes ASP a good alternative when you want to hide your code from prying eyes. That’s something you cannot do with client side script – a savvy user can always find your code. (see graphic in Multi-tier applications)
The ASP page contains two structures you may not be familiar with. The first is the page directive:
<%@ language=”JavaScript”%>
This tells the ASP engine that the instructions for this page will be written in JavaScript. This is important because the default language (i.e. no language specified) is VB Script.
The next possibly unfamiliar structure is the output shorthand:
<%= Request(“firstName”) %>
The <%= … %> output shorthand simply tells the ASP engine to evaluate the expression between the tags and write the output of the evaluation there. In the case above, I’m accessing the Request Variables called firstName and lastName (that’s what I named the input fields in the HTML form) and printing the values passed by the user next to some descriptive labels.
Accessing Request variables isn’t all that difficult. Just be sure to use valid JavaScript identifiers for the names of your <input> tags and you shouldn’t have too many problems.
|
Specifies cookie values. Using this collection, you can set cookie values. |
|
Indicates whether page output is buffered. |
|
|
Sets a header to notify proxy servers or other cache mechanisms whether they can cache the output generated by ASP. |
|
|
Appends the name of the character set to the content-type header. The character set specifies for the browser how to display characters. |
|
|
Sets the codepage for data in the intrinsic objects for one response. The codepage specifies for the server how to encode characters for different languages. |
|
|
Specifies the HTTP content type for the response. |
|
|
Specifies the length of time before a page cached on a browser expires. |
|
|
Specifies the date and time on which a page cached on a browser expires. |
|
|
Indicates whether the client has disconnected from the server. |
|
|
Sets the LCID for data for one response. The LCID refers to how dates, times, and currency are formatted for a specific geographical locale. |
|
|
Set the value for the pics-label response header to indicate the PICS content rating. |
|
|
The value of the status line returned by the server. |
|
Sets the HTML header name to value. |
|
|
Adds a string to the end of the Web server log entry for this request. |
|
|
Writes the given information to the current HTTP output without any character-set conversion. |
|
|
Erases any buffered HTML output. |
|
|
Stops processing the .asp file and returns the current result. |
|
|
Sends buffered output immediately. |
|
|
Sends a redirect message to the browser, causing it to attempt to connect to a different URL. |
|
|
Writes a variable or text to the current HTTP output as a string. |
The Response object allows you to gain control over how information is sent to the client. It enables you to modify the response given back to the web server before being sent to the client. You can add cookies and HTML headers, buffer output, set locales, write to the HTML document, and evn redirect the user to any URL based on criteria you define. In short, the Response object gives you far greater control over what the user sees than does HTML simply because you can react to input programmatically before the HTML is generated.
Although you may not know it, you’ve already made use of the Response object. The <%= … %> shorthand is actually translated by the ASP engine to Response.Write(…)! So, your requestExample.asp page could have been written as follows:
<%@ language=”JavaScript”%>
<html>
<head>
<title>Request Object Handler</title>
</head>
<body>
Hello:<br>
First Name: <% Response.Write(Request(“firstName”)) %><br>
Last Name: <% Response.Write(Request(“lastName”)) %>
</body>
</html>
So far, you’ve only seen the surface of the Write() method’s capabilities. The coolest aspect of the Write() method (IMHO) is the fact that you can dynamically write HTML back to the page. So, a third version of requestExample.asp might look something like this:
<%@ language=”JavaScript”%>
<html>
<head>
<title>Request Object Handler</title>
</head>
<body>
<%
Response.Write(‘<table border=”0”>);
Response.Write(‘<tr>’);
Response.Write(‘<td colspan=”2”>Hello</td>’);
Response.Write(‘</tr>’);
Response.Write(‘<tr>’);
Response.Write(‘<td>First Name: </td>’);
Response.Write(‘<td>’ + Request(“firstName”) + ‘</td>’);
Response.Write(‘</tr>’);
Response.Write(‘<tr>’);
Response.Write(‘<td>Last Name: </td>’);
Response.Write(‘<td>’ + Request(“lastName”) + ‘</td>’);
Response.Write(‘</tr>’);
Response.Write(‘</table>’);
%>
</body>
</html>
The above code, albeit trivial, demonstrates the fact that you can easily write out any HTML through the Response object. Although I didn’t include any conditionals, you can certainly tailor your output based on the data you have at hand.
Another powerful method built into the Response Object is the Redirect() method. As the name implies, the Redirect() method allows you to send users anywhere you’d like based on conditions defined by you. This is certainly helpful when you need to direct users to an error page if, for example, they haven’t filled a form in correctly.
Calling the Redirect() method is simple:
Response.Redirect(‘http://msdn.microsoft.com’);
The above code redirects the user’s browser to the MSDN site at Microsoft. There is a caveat however. You must call the Redirect() method BEFORE any HTTP Response is generated. This means that the call to Redirect() must occur before any calls to Response.Write() or any processing of HTML literals. In other words, Redirect() must occur above the HTML tag in your ASP.
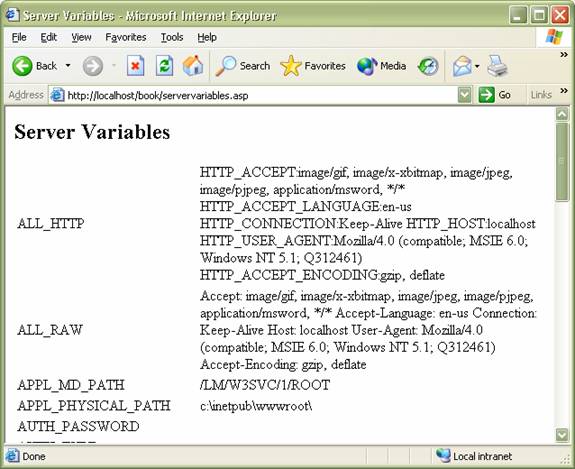
As an example, I’ll write a simple Active Server Page that displays all of the members of the Request object’s ServerVariables collection. Open your text editor, enter the following code, and store it inside a folder called “book” inside the wwwroot folder:
<%@ language="JavaScript" %>
<html>
<head><title>Server Variables</title></head>
<body>
<%
Response.Write("<h2>Server Variables</h2>");
Response.Write('<table border="0">');
var count = Request.ServerVariables.Count;
var name;
//one-based
for(i=1;i<=count;i++){
name = Request.ServerVariables.Key(i);
Response.Write('<tr>');
Response.Write('<td>' + name + '</td>');
Response.Write('<td>' + Request.ServerVariables(name) + '</td>');
Response.Write('</tr>');
}
Response.Write('</table>');
%>
</body>
</html>
The interesting parts occur between the <body> tags. As you can see, I’ve set up a block of script to be executed on the server using the <%….%> notation. Inside that block, I used the Response Object to write out some HTML strings back to the browser.
The loop within the script loops through each of the members of the ServerVaribles collection and places the key in the left column of a table and the value of the key in the right column. Here’s what the page looks like on my machine:
Note that you must use HTTP to force the web server to hand off the page to the ASP engine. You cannot use the File…Open command to view the file as that uses the File protocol rather than the HTTP protocol. (I know I’ve said this before but I still make that mistake too!). After you take a look at what your server sends back to the user, view the source of the page. Notice that your server side script has disappeared to be replaced by straight HTML code. That’s important: The response sent back to the browser is always an HTML stream. One interesting side effect of that process is that users don’t ever see your code – they only see the results of your code. That’s nice, especially if you are writing code that you don’t want a competitor to see. One final thing to note is that the static aspects of your page (the HTML framework) remain unchanged
Each time a request is made for a resource within your ASP application, the application will create a Request Object and a Response Object for you. The Request Object will only survive during the time the request is processed so if you need to store information about the request, you’ll need to store it elsewhere. Later, you’ll learn about the Application and Session objects (which are also created for you). They are good candidates for storing information as they have a longer lifecycle.
The Application object represents your ASP application programmatically. An ASP application consists of all of the resources (ASPs, HTML docs, Scripts, etc) contained within the root folder of the application. This includes all of the sub-folders. You can use the Application object to store information and/or resources that all users within the application can access. Like the Request and Response objects, the Application object is created for you when a user enters your application.
|
Contains all of the items that have been added to the application through script commands. |
|
|
Contains all of the objects added to the session with the <OBJECT> tag. |
|
Deletes an item from the Application object's Contents collection. |
|
|
Deletes all items from the Application object's Contents collection. |
|
|
Prevents other clients from modifying Application object properties. |
|
|
Allows other clients to modify Application object properties. |
As you can see, the Application object includes Lock() and Unlock() methods. These methods provide a mechanism so that you can avoid different users modifying Application resources simultaneously.
The Application object possesses a single lock. When you call the Lock() method, you block other programs from accessing the lock. Programs trying to access the lock will simply wait for the lock to be released before accessing the lock. So, be careful when you lock the application that you eventually unlock it. Also, try to keep the Application locked for the shortest time possible. Remember that ALL users may be accessing the Application object. To make your application scalable (i.e. capable of handling a large number of users) use the Lock() method sparingly.
Storing data in the Application object from an ASP is deceptively simple: Just create a variable inside the Application context and assign the data:
Application(“myVar”) = ‘my data’;
The above stores the String ‘my data’ in a variable called myVar inside the application object. To modify an existing Application variable, you should lock the application, modify the data, then unlock the application:
Application.Lock();
Application(“myVar”) = ‘your data’;
Application.Unlock();
You can store anything you’d like in an Application variable including objects. Later, in the XML section, I’ll store a cached XSLT stylesheet in the Application object so that XML files can have access to it.
global.asa is a special, optional file that you can include in your ASP applications in the root directory of the application. The server will locate the file automatically and execute the code within the file at the appropriate time. It contains two special method signatures that allow you to capture events for your ASP applications. They are:
Application_OnStart() and
Application _ OnEnd()
The bodies of these two methods are executed when an ASP applications start and end (hence the names!). In the Application_OnStart() method, you can initialize any resources that your application may need such as a counter or database connection pool. Application_OnEnd() is potentially a place where you can clean up any resources when your application ends.
The code you write inside global.asa MUST be enclosed inside <script> tags:
<script language=”JavaScript” runat=”server”>
function Application_OnStart(){
//your initialization code
}
function Application_OnEnd(){
//your clean-up code
}
</script>
If you include and code outside the script tags, the server will return an error. The code contained within the Application_OnStart() method is executed upon the first request for resources within the application. The code within the Application_OnEnd() method is executed when no users have made requests for resources withn the application.
You are also allowed to write functions outside the event handlers but those functions are NOT available to other ASP pages. If you need to write functions that are accessible from other ASP pages, write them in separate files and include them when necessary.
Open your text editor and create the applicationCounter.asp file as follows:
<%@ language="JavaScript" %>
<%
Application.Lock();
var counter = Application("counter");
if(counter == null)
counter = 0;
counter++;
Application("counter") = counter;
Application.Unlock();
%>
<html>
<head>
<title>Application Counter</title>
</head>
<body>
Number of Visitors since last re-start: <%= counter %>
</body>
</html>
The above code creates a counter for this web application. It first locks the application. Then, it accesses the value of the Application object called “counter” and stores it in the local variable called counter. Next, the code checks whether or not a value has been stored in the Application(“counter”) variable (the variable will be null if this is the first request). If this is the first request, the value is initialized to 0. Then, the local variable is incremented and re-stored in the Application(“counter”) object. Finally, the application is unlocked. The rest of the page simply displays the value of the counter.
While the Application object represents all users within the application, the Session object represents a single user within the application. Objects stored in the Session object are not discarded when the user jumps from page to page inside the application. In fact, Session objects stay alive for a pre-determined time so that, should users leave your application and then return within the pre-determined time, the data stored in the session is still valid. The default pre-determined time (i.e. no pre-determined time is declared) is 20 minutes.
Like the Request, Response, and Application objects, the Session object is created automatically by the web server. The Session is alive until it either expires or is abandoned.
A good use of the Session object is to store data that needs to “follow” the user around the application. Things like user preferences and shopping carts are good candidates for Session storage.
|
Contains the items that you have added to the session by using script commands. |
|
|
Contains the objects created by using the <OBJECT> tag and given session scope. |
|
Sets the codepage for data in the intrinsic objects for an entire session. The codepage specifies to the server how to encode characters for different languages. |
|
|
Sets the LCID for data for an entire session. The LCID refers to how dates, times, and currency are formatted for a specific geographical locale. |
|
|
Returns the session identification for this user. |
|
|
The time-out period for the session state for this application, in minutes. |
|
This method destroys a Session object and releases its resources. |
|
|
This method deletes an item from the Contents collection. |
|
|
This method deletes all items from the Contents collection. |
Setting the Session.Timeout property determines how long the Session stays alive. Calling the Session.Abandon() method discards the user’s Session. Use the Remove() and RemoveAll() methods to discard Session object variables.
You can store data in the Session object much as you do in the Application object. It is just a matter of creating a Session variable and then storing data in it:
Session(“mySessionData”) = ‘my session data’;
The above stores the String “my session data” in a Session variable called mySessionData.
Just as the Application object has event logic stored in globval.asa, so, too, does the Session Object. Once again, 2 special method signatures allow you to initialize and clean-up Session objects. The method signatures are as follows:
Session_OnStart()
Session_OnEnd()
Again, use the Session_OnStart() method to create data for each Session (i.e. for each user) and Session_OnEnd() to clean up Session objects.
Open your favorite text editor and create sessionCounter.asp as follows:
<%@ language="JavaScript" %>
<%
if(Session("init")==null)
Response.Redirect("init.asp");
%>
<html>
<head>
<title>Session Counter</title>
</head>
<body>
<%
var sessionCount = Session("sessionCount");
sessionCount = sessionCount + 1;
Session("sessionCount") = sessionCount;
%>
<p>You have accessed this page <%= sessionCount %> times</p>
</body>
</html>
The above code is nearly identical to the Application Counter page except that the counter only applies to the current Session. In other words, the Session Counter tells you how many times each user hits the given page.
The Server object represents the web server in an ASP application. It allows you to perform programmatic tasks such as instantiating objects from components stored on the server. You can use the Server Object to access methods and properties on the server. The Server object is not technically created for you – but it’s alias is. That is, you can reference the Server object without first having to create it yourself.
|
The amount of time that a script can run before it times out. |
|
Creates an instance of a server component. |
|
|
Executes an .asp file. |
|
|
Returns an ASPError object that describes the error condition. |
|
|
Applies HTML encoding to the specified string. |
|
|
Maps the specified virtual path, either the absolute path on the current server or the path relative to the current page, into a physical path. |
|
|
Sends all of the current state information to another .asp file for processing. |
|
|
Applies URL encoding rules, including escape characters, to the string. |
The MapPath() method maps the specified virtual or relative path to the physical path of resources. In other words, you can specify a relative path to a resource as an argument to the MapPath() method and the method will find the resource for you. Of course you’re asking “relative to what?” The MapPath() method uses the application root path as the starting point.
The CreateObject() method is perhaps the most powerful method of the Server object. It allows you to create instances of server side components. You can then use those instances – and their properties and methods – in your ASPs.
Following is a code snippet that makes use of MapPath() and CreateObject():
<%
var con = Server.CreateObject("ADODB.Connection");
con.Open("DRIVER={Microsoft Access Driver (*.mdb)};DBQ=" + Server.MapPath("\\book\\db\\assets.mdb"));
%>
The above code is actually code that we will make use of a little later on. First, the code instructs the Server object to create an instance of an Active Data Objects Database Connection. As I’m sure you guessed, this object is used to create a “pipeline” between your ASP and some database.
The next line calls the Open() method of the Connection object. The Open() method’s argument is a statement about which database the ASP will connect to. In the above case, the database drive is the driver for a Microsoft Access database. Next, the path to the actual .mdb file is established by passing a path argument to MapPath(). Note the double backslashes. The bacslash is the escape character in JavaScript – but it’s also the path separator on Windows boxes. In order to use a backslash within a String in JavaScript, you must “escape out” the backslash character. The argument specified to MapPath() above indicates that the physical path to the file is:
{pathToWWWPublicRoot}\book\db\assets.mdb
You’ll experiment a little later with some of the built-in objects of IIS.
The ObjectContext object is used for ASPs involved in transactions. When a page includes the@transaction directive, it runs within a transaction and doesn’t finish processing until the transaction succeeds completely or fails. Discussion of the ObjectContext object is outside the scope of this book. In the interests of completeness, here is the API:
|
Declares that the transaction initiated by the script has not completed and that the resources should not be updated. |
|
|
Declares that the script is not aware of any reason for the transaction not to complete. If all components participating in the transaction also call SetComplete, the transaction completes. |
You may have noticed the Server.GetLastError() method in the Server Object. The GetLastError() method returns the ASPError object. The ASPError object contains read-only properties that can be accessed to help you figure ot why your code doesn’t work! Here is a list of the properties of the ASPError object:
|
Returns an error code generated by IIS. |
|
|
Returns the standard COM error code. |
|
|
Returns the actual source code, when available, of the line that caused the error. |
|
|
Indicates if the source of the error was internal to ASP, the scripting language, or an object. |
|
|
Indicates the name of the .asp file that was being processed when the error occurred. |
|
|
Indicates the line within the .asp file that generated the error. |
|
|
Indicates the column position within the .asp file that generated the error. |
|
|
Returns a short description of the error. |
|
|
Returns a more detailed description of the error, if it is an ASP-related error |